My favorite pumpkin pie!

Screen Shot 2015-11-22 at 8.30.07 AM
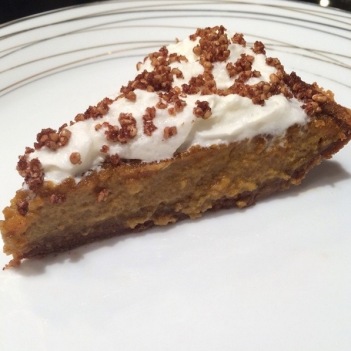
My favorite holidays are Halloween and Thanksgiving — pumpkincentric holidays! However, I’ve never been the biggest fan pumpkins. I’ve never enjoyed picking them because I thought they were heavy and they made my coat dirty, cleaning  a pumpkin and roasting seeds takes me twice as long as everyone else, I struggle to carve literally any shape onto it, and I don’t think the taste of a pumpkin muffin is worth it! It wasn’t until recently that I discovered canned pumpkin, which allows me to easily experiment  with pumpkin products. In doing so, I’ve discovered Bobby Flay’s pumpkin pie recipe, which has made me ENTIRELY rethink the joys of pumpkin. This is the creamiest baked pumpkin you’ll ever taste with a hint of spice (ginger, nutmeg and cinnamon) topped with a wonderful cinnamon crunch sprinkled on top and paired with graham cracker crust which absorbs the perfect amount of moisture. I praise this recipe enough. It’s no harder than your average pumpkin pie but the taste is so much more extraordinary, everyone at Thanksgiving will be impressed with your culinary skills!

See ingredients below and the link for instructions. You won’t be disappointed!
Cinnamon Crunch:
1/2 cup all-purpose flour
1/2 cup quick-cooking rolled oats
1/2 cup light muscovado sugar
1 teaspoon ground cinnamon
7 tablespoons unsalted butter, cut into small cubes, cold
Crust:
2 cups graham cracker crumbs
8 tablespoons (1 stick) unsalted butter, melted
1/8 teaspoon ground cinnamon
1 large egg, lightly beaten
Filling:
3 large eggs
3 large egg yolks
3/4 cup dark muscovado sugar
1/4 cup granulated sugar
2 tablespoons molasses
11/2 cups canned pumpkin puree
11/4 teaspoons ground cinnamon, plus more for the top
1 teaspoon ground ginger
1/2 teaspoon ground nutmeg
1/4 teaspoon ground cloves
1/2 teaspoon fine salt
1 cup heavy cream
1/2 cup whole milk
1/2 vanilla bean, split lengthwise, seeds scraped out and reserved, or 2 teaspoons pure vanilla extract
3 tablespoons unsalted butter, melted
Bourbon-Maple Whipped Cream:
1 1/4 cups heavy cream, very cold
1/2 vanilla bean, split lengthwise, seeds scraped out and reserved
2 tablespoons Grade B maple syrup
1 to 2 tablespoons bourbon

Poached Pear

Screen Shot 2015-10-25 at 5.23.46 PM

Ah, fall cooking. It’s the one time of year I pretend I’m super healthy. Pumpkin and nuts are healthy. Apples are definitely healthy. I’m pretty sure I read pears are good for the skin somewhere! All that aside, I also look for easy recipes I can make on a week night with only things in the cupboard. This is one of the those 5 ingredients or less recipes and that’s always fine with substations. Poaching pears is also the easiest thing to make. It would be tied with toast if I didn’t always burn the bread… But that’s okay because people are more impressed with these pears than groggy breakfast food in any case!

Poached Pears:

  • 4 ripe pears (any kind you like!)
  • 1 quart of water
  • 1 cup of sugar (or honey or maple syrup)
  • 3 cups of  sweet white wine (I prefer Chambord or Kirsch)
  • 1 teaspoon lemon juice
  • 1 teaspoon vanilla
  • 2 teaspoons of cinnamon

Bring water and sugar to a boil in a saucepan until sugar is dissolved. Place peeled pears in the sugar water and add the rest of the ingredients. Allow to simmer for 20 minutes (until the pears are tender). Let the pears cool and then serve on their own or with ice cream!

Banana Nutella Cupcakes


Banana Nutella Cupcake

What’s better than nutella? Nothing! How do you make it guilt free? Add fruit! At least that’s what my mom taught me. And what’s the beauty of banana cupcakes and muffins? You can use whatever is on hand in the kitchen! I love this recipe because it’s moist and the cinnamon gives it a great taste that isn’t too sweet. To make the recipe as easy as possible and in line with “using whatever from the kitchen,” I used nutella straight from the jar instead of making a nutella frosting. The result was perfect! Note: The caramelized banana stayed until overnight and then started to brown. If possible, make the caramelized banana right before serving — it’s won’t take more than 10 minutes. 

Cupcake:

  • 3 ripe bananas
  • 2 cups of flour
  • 1/2 teaspoon baking soda
  • a pinch of salt
  • 1 stick of butter
  • 1 cup of horchata (or whatever kind of milk you want!)
  • 2/3 cups sugar
  • 2 eggs
  • a teaspoon of vanilla
  • 1/2 teaspoon of cinnamon

Bake at 350F. Once cooled, slather in nutella and add the cartelized banana.

Caramelized banana:

  • One  sliced non-ripe banana
  • 1 tablespoon of butter
  • 1/2 teaspoon brown sugar
  • Optional: rum

Put the sliced banana in a frying pan with butter and sugar and cook until it browns. I added a drop of rum to mine once it was cooked.

Peach Squares

Peach Squares adapted
Peach Squares adapted — so easy!

Every fall my mom would make the most amazing peach hand pies — my dad and I fought tooth and nail for the last one, every time! She claims making her mini pies is the easiest thing in the world, but I always mess up without her motherly guidance! Now that I live on my own, I get nostalgic for my mom’s cooking that I can’t reproduce… Until I saw peach squares pop up on Goop’s Instagram via Chef Zoe Nathan of Huckleberry. They are similar to what my mom made me and I’ve never had any complaints about a single batch! You can make these babies with just 30 minutes and eat hot or cold.

Peach Square Recipe via Goop:
http://goop.com/recipes/peach-squares/

Eleni’s Peach Square lazy adaptation: 

  • 1 batch of puff pastry or pie crust
  • 5 or 6 peaches, finely cut with skin on
  • ¼ cup granulated sugar
  • ¼ cup g brown sugar
  • 2 tablespoon cinnamon
  • 1 tablespoon nutmeg
  • 4 tbsp unsalted butter, melted

1. Allow the pastry dough to defrost.
2. Once pastry dough is defrosted, finely slice the peaches.
3. Add sugars, spices, and butter to sliced peaches.
4. Cut the pastry into squares (any size you want). Place them on baking sheet and add sliced peaches on top.
5. Bake at 350F until golden brown. This take about 20-30 minutes

Voila! Your friends will think you’re a master chef!

Red Fruit Tiramisu

Red fruit tiramisu for six!

My family has always had an open door policy. Want to bring a friend to Sunday lunch? Great! Does your friend have 12 siblings who all want to bring their significant others? No problem — the more the merrier! Now that I’m living on my own, I have to be adaptable when my dinner party  jumps from 4 people to 8 overnight. Normally I’ll make cookies or cupcakes (no one knows if I overcooked!) but it can be time consuming to constantly taking things in and out of the oven. When I explained my predicament to a friend, she sympathized and gave me her quick and easy bake-less cake. What an idea it is! It’s tastes fresh and sweet, but not too sweet. You can decide if you want it to be a cake for two or twenty. And it’s so much fun to make because it’s like edible building blocks!

Red Fruit Tiramisu

(This recipe serves 6, but you can add or subtract ingredients accordingly.)

“Cake”:

  • 1 lb. fresh raspberries
  • 40 ladyfingers (I bought mine at Whole Foods)
  • 1.5 cups of mascarpone
  • 1 and 1/4 cups whipping cream
  • 3/4 cups granulated sugar
  • 1/4 TS vanilla extract
  • 1/4 TS almond extract

Syrup:

  • 1 cup confectioner’s sugar
  • 5 TB kirsch (substitute any raspberry alcohol you like)
  • 1 and 1/4 cups water

Extra: Raspberries to decorate!

Syrup: Heat water and sugar in a saucepan. Once the sugar dissolves, add alcohol and remove from heat.

Cream: Put mascarpone, granulated sugar, and vanilla in a bowl and mix. Put whipping cream in a different bowl and mix until it becomes stiff. Add mascarpone mixture to whipping cream and beat.

Cake: Dip lady fingers (one by one) in syrup. Be careful that they don’t get too wet, otherwise the cake will be soggy and runny.

Assemble:  Place lady fingers dipped in syrup on serving platter until you have the desired length and width of cake. Spread the cream on top of the lady finger layer. Add a layer of flattened raspberries. Repeat for another layer! (You can have as many layers as you want, I normally do three layers). Once you have the desired amount of layers, smooth the cream as if it were a frosting and use raspberries (and almonds if you desire) to garnish!

Before eating: refrigerate the cake overnight for the lady fingers to fully moisten and become cake-like. If you have left over cream, dip any red fruits you have into it! It’s divine!

Peach and Maple, Almond Crusted Galette

Peach and Maple, Almond crusted galette
Peach and maple, almond crusted galette

With the end of stone fruit season looming, I’m doing my best to eat as many peaches as possible! I’ve been using them in my morning yogurts, salads, tartines and desserts — they go with almost everything. I noticed a few lonely peaches at the farmers market this morning and just had to have them for my dinner party tonight. I needed something quick and easy for dessert because as usual, I pick labor intensive appetizers and entrees. To give the usual peach tart a bit of flare I added two ingredients: maple syrup to celebrate the start of Autumn and almond because it’s my favorite flavor.

Peach and Maple, Almond Crusted Galette Recipe

Galette Dough

  • cups All-purpose flour
  • 1 cup of almond flour
  • 1 tablespoon almond extract
  • tablespoon sugar
  • A pinch of salt
  • 2 sticks of unsalted butter (room temperature) 
  • Approximately 1/2 cup of ice water

Whisk the flours, sugar and salt together. Cut the butter into smaller pieces and mix into the flour mixture. Add ice water to the mixture and continue to stir until it becomes dough (you may need extra water).  Once the dough has formed, mix it into a ball and allow to chill for at least one hour before using — it’ll be easier to work with!

Maple Peach Assembly 

  • Finely slice 4-6 peaches (I used yellow)
  • 2 teaspoons of maple syrup
  • 1 teaspoon of brown sugar
  • 1/2 teaspoon of nutmeg
  • 1/2 teaspoon of cinnamon
  • 2 tablespoons of butter (room temperature)

Once the peach mixture is done, take the dough out of the refrigerator. Flatten it out on a baking sheet (it should measure ~10 inches) and pour the peaches into the dough. Gently wrap the dough around the edge of peaches and bake at 375F until the crust is golden brown. This should take 30-40 minutes. Let it cool and dig in!